

Serve your webpage
In this step, you will start up your web server so that a client can connect to it, and control your LED and read the temperature.
Create a function that will start your web server, using the connection object you saved as a parameter. The state and temperature variables need to be set for your HTML data. The state is going to start as being set to 'OFF', and the temperature to 0, which means you should also ensure that the LED is off when the server starts.
def serve(connection):
    #Start a web server
    state = 'OFF'
    pico_led.off()
    temperature = 0
When your web browser asks for a connection to your Raspberry Pi Pico W, the connection needs to be accepted. After that, the data that is sent from your web browser must be done in specific chunks (in this case, 1024 bytes). You also need to know what request your web browser is making — is it asking for just a simple page? Is it asking for a page that doesn’t exist?
You want to keep the web server up and listening all the time, so
that any client can connect to it. You can do this by adding a while True: loop. Add these five lines of code so that you can accept a request, and print() to see what the request was. Add a call to your serve function in your calls at the bottom of your code.
def serve(connection):
    #Start a web server
    state = 'OFF'
    pico_led.off()
    temperature = 0
    while True:
        client = connection.accept()[0]
        request = client.recv(1024)
        request = str(request)
        print(request)
        client.close()


ip = connect()
connection = open_socket(ip)
serve(connection)
Test: Run your program and then type in the IP address into a web browser’s address bar on your computer.

You should see something like this in the shell output in Thonny.
>>> %Run -c $EDITOR_CONTENT
Waiting for connection...
Waiting for connection...
Waiting for connection...
Connected on 192.168.1.143
b'GET / HTTP/1.1\r\nHost: 192.168.1.143\r\nUser-Agent: Mozilla/5.0 (Windows NT 10.0; Win64; x64; rv:101.0) Gecko/20100101 Firefox/101.0\r\nAccept: text/html,application/xhtml+xml,application/xml;q=0.9,image/avif,image/webp,*/*;q=0.8\r\nAccept-Language: en-GB,en;q=0.5\r\nAccept-Encoding: gzip, deflate\r\nConnection: keep-alive\r\nUpgrade-Insecure-Requests: 1\r\n\r\n'
b'GET /favicon.ico HTTP/1.1\r\nHost: 192.168.1.143\r\nUser-Agent: Mozilla/5.0 (Windows NT 10.0; Win64; x64; rv:101.0) Gecko/20100101 Firefox/101.0\r\nAccept: image/avif,image/webp,*/*\r\nAccept-Language: en-GB,en;q=0.5\r\nAccept-Encoding: gzip, deflate\r\nConnection: keep-alive\r\nReferer: https://192.168.1.143/\r\n\r\n'
Next, you need to send the HTML code you have written to the client web browser.
def serve(connection):
    #Start a web server
    state = 'ON'
    pico_led.on()
    temperature = 0
    while True:
        client = connection.accept()[0]
        request = client.recv(1024)
        request = str(request)
        print(request)
        html = webpage(temperature, state)
        client.send(html)
        client.close()


ip = connect()
connection = open_socket(ip)
serve(connection)
Refresh your page when you’ve run the code again. Click on the buttons that are displayed. In Thonny, you should then see that there are two different outputs from your shell.
b'GET /lighton? HTTP/1.1\r\nHost: 192.168.1.143\r\nUser-Agent: Mozilla/5.0 (Windows NT 10.0; Win64; x64; rv:101.0) Gecko/20100101 Firefox/101.0\r\nAccept: text/html,application/xhtml+xml,application/xml;q=0.9,image/avif,image/webp,*/*;q=0.8\r\nAccept-Language: en-GB,en;q=0.5\r\nAccept-Encoding: gzip, deflate\r\nConnection: keep-alive\r\nReferer: https://192.168.1.143/\r\nUpgrade-Insecure-Requests: 1\r\n\r\n'and
b'GET /lightoff? HTTP/1.1\r\nHost: 192.168.1.143\r\nUser-Agent: Mozilla/5.0 (Windows NT 10.0; Win64; x64; rv:101.0) Gecko/20100101 Firefox/101.0\r\nAccept: text/html,application/xhtml+xml,application/xml;q=0.9,image/avif,image/webp,*/*;q=0.8\r\nAccept-Language: en-GB,en;q=0.5\r\nAccept-Encoding: gzip, deflate\r\nConnection: keep-alive\r\nReferer: https://192.168.1.143/lighton?\r\nUpgrade-Insecure-Requests: 1\r\n\r\n'Notice that you have /lighton?, lightoff?, and close? in the requests. These can be used to control the onboard LED of your Raspberry Pi Pico W and close your server.
Split the request string and then fetch the first item in the
list. Sometimes the request string might not be able to be split, so
it’s best to handle this in a try/except.
If the first item in the split is lighton? then you can switch the LED on. If it is lightoff? then you can switch the LED off. If it is close? you can perform a sys.exit()
def serve(connection):
    #Start a web server
    state = 'ON'
    pico_led.on()
    temperature = 0
    while True:
        client = connection.accept()[0]
        request = client.recv(1024)
        request = str(request)
        try:
            request = request.split()[1]
        except IndexError:
            pass
        if request == '/lighton?':
            pico_led.on()
        elif request =='/lightoff?':
            pico_led.off()
        elif request == '/close?':
            sys.exit()
        html = webpage(temperature, state)
        client.send(html)
        client.close()
Run your code again. This time, when you refresh your browser window and click on the buttons, the onboard LED should turn on and off. If you click on the Stop Server button, your server should shutdown.
You can also tell the user of the webpage what the state of the LED is.
def serve(connection):
#Start a web server
state = 'ON'
pico_led.on()
temperature = 0
while True:
client = connection.accept()[0]
request = client.recv(1024)
request = str(request)
try:
request = request.split()[1]
except IndexError:
pass
if request == '/lighton?':
pico_led.on()
state = 'ON'
elif request =='/lightoff?':
pico_led.off()
state = 'OFF'
elif request == '/close?':
sys.exit()
html = webpage(temperature, state)
client.send(html)
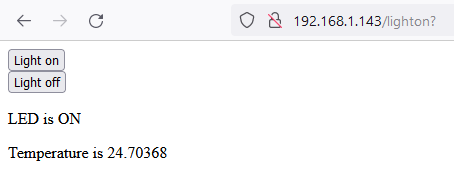
client.close()Now when you run the code, the text for the state of the LED should also change on the refreshed webpage.
Lastly, you can use the onboard temperature sensor to get an approximate reading of the CPU temperature, and display that on your webpage as well.
def serve(connection):
    #Start a web server
    state = 'ON'
    pico_led.on()
    temperature = 0
    while True:
        client = connection.accept()[0]
        request = client.recv(1024)
        request = str(request)
        try:
            request = request.split()[1]
        except IndexError:
            pass
        if request == '/lighton?':
            pico_led.on()
            state = 'ON'
        elif request =='/lightoff?':
            pico_led.off()
            state = 'OFF'
        elif request == '/close?':
            sys.exit()
        temperature = pico_temp_sensor.temp
        html = webpage(temperature, state)
        client.send(html)
        client.close()
Test: You can hold your hand over your Raspberry Pi Pico W to increase its temperature, then refresh the webpage on your computer to see the new value that is displayed.
